Welcome to the world of Sun Ovens. Below you will find the original Sun Oven Tutorial. This introduces you to everything you need to know about using the Sun Oven.
In the next few sections, I will familiarize you with how the Sun Oven is designed to work. We will then discuss basic food safety and maintenance of your oven.
While this info is specifically written for the All-American Sun Oven, most of the concepts hold true to all other solar ovens, including the GoSun Fusion (and other tube cookers), and the foldable solar ovens found on Amazon.
Please enjoy this tutorial and welcome to the fun of cooking with the sun.
1) Keep in mind that food cooks at a temperature of 180° and above in the Sun Oven, if the temperature drops below 180°, you’re no longer cooking.
2) Keeping your reflectors clean by simply using glass cleaner will always enhance the performance and heating of the Sun Oven.
3) When you store your Sun Oven, don’t lock the glass door down with the latches, by leaving it open it won’t retain the smell of the food you cooked before putting it away.
4) Any roast or large bird (for example a turkey) over 4 pounds must be 100% thawed before putting them into a pre-heated Sun Oven, or they won’t cook properly.
5) The Sun Oven should always be preheated before cooking. It is recommended that you place the Sun Oven with the glass door closed and latched down in the sun and let it preheat. In strong sun the Sun Oven will usually reach 275 to 300 degrees F in about twenty minutes.
6) The Sun Oven method of cooking is so natural and subtle that much less moisture is required for recipes – cooked in covered pans, that is. The natural, internal juices come into unique play, resulting in a superior, moist taste. Be sure to cut down, by at least one-third, any liquid measurements called for in rice, stews or sauces. This does NOT apply to bakery products.
7) Since foods do not burn in the Sun Oven, it is not necessary to stir foods after they are placed in the oven. Use a meat thermometer to determine when to remove meats (put the meat thermometer in the meat before placing it in the oven). Opening the oven door unnecessarily will slow the cooking process, since some heat will escape.
8) When you are done cooking it is best to remove any moisture from the interior of your Sun Oven by wiping it out with a dry cloth. Maintenance on your Sun Oven is very minimal. Using any non-abrasive glass cleaning solution, such as Windex, will keep the reflector material and glass clean. If the reflectors and glass are not kept clean, the oven will not reach its target temperature.
Remove the protective film from the reflectors.
Set the Sun Oven facing the sun. Close the glass door and turn both latches over the glass. Leave the Sun Oven in this position for 25 to 30 minutes.
Using an oven mitt, release the latches and open the glass door. Pour 1 ½ cups of water mixed with a few drops of dish soap, into a pot and place the pot, without a lid, inside the hot Sun Oven and close and latch the glass door.
Realign the Sun Oven.
Leave the Sun Oven in the sun for 90 to 120 minutes with the open pot of soapy water. Every 30 minutes realign the oven.
After the oven has been heated and well steamed, completely clean the inside of the chamber and the inside of the glass door with the hot soapy water mixture. While cleaning, it is best to scrub hard on the interior of the glass around the area where the glass meets the black gasket.
Now you’re ready to start cooking.
The Sun Oven is actually pretty simple. They use the same principles as the Greenhouse Effect. This is the same effect you experience in a car on a sunny day. When sealed up, a car can get toasty warm even if it’s cold outside.
About 60% of the heating energy comes from the sun shining directly on the Sun Oven’s glass door. The other 40% comes from the sun bouncing off the reflectors into the oven’s chamber. The glass, insulation, and sealing gasket all trap the heat, making the oven super efficient.
On perfect days, with totally clear skies, and no haze or clouds, the oven can reach temperatures of 400°. On any day where the sun casts a shadow, the Sun Oven stay’s consistently at temperatures between 300° and 375° if aligned every 30 minutes to the sun.
Is slow cooking meat safe?
Naturally, a few questions may come up about food safety and slow cooking in a Sun Oven.
• Are there safety issues?
• Is salmonella a problem?
• What are the various things I need to concern myself with?
The danger zone for cooking beef, pork, and poultry is between 40° and 150° Fahrenheit. When food sits in this range for 90 minutes, the environment is perfect for bacterial growth. The exception to this is dehydrating.
Proper use of the Sun Oven moves food through this zone quickly and safely. When pre-heated, using the Sun Oven does not differ from using your normal oven. Even long-term cooking with small frozen meals heat quickly and don’t dwell in the danger zone long enough for bacteria to grow.
Let’s look at two examples.
Cooking Thawed Chicken:
First, let’s look at cooking a whole thawed chicken. This recipe calls for pre-heating the Sun Oven and a three-pound whole bird. Once pre-heated, the Sun Oven is approximately 350°. Place chicken and vegetables in a pot and place the pot in the oven. Within 90 to 120 minutes, the chicken is hot, moist, and ready to eat at 165° to 185°. During the cooking time, the chicken never dwells in the danger zone and safely reaches 165° where the USDA recommends as the safe internal temperature for poultry.
Cooking Frozen Chicken:
Second, let’s look at a full day of cooking with a frozen chicken. Start with a frozen chicken inside the Sun Oven at eight o’clock in the morning. Position the oven where the sun will be at noon (due south). From 8:00 until 4:00, the sun is over the reflectors and heating the oven. In the morning the chicken remains below 40° safely cool until the sun is over the reflectors heating the oven.
Two things now happen at once. The chicken thaws and the oven heats to a temperature of over 300°. The sun remains directly overhead for about 4 hours. This cooks the now thawed chicken to its final temperature of over 165°. This happens in about 2 hours.
If you use a Dutch oven or a cast-iron pot, they keep the heat for many hours. This allows your food to stay moist, warm, and above 150°, out of the danger zone, for six to seven hours, as the sun passes over the reflectors.
This process is perfect for chickens that are four pounds or less, as well as beef or pork roasts that are four pounds or less.
One note about Turkeys. You must defrost turkeys 100% before putting them into a preheated Sun Oven.
Bugs and Insects
The Sun Oven chamber has an airtight seal. Aside from creating the perfect cooking environment that locks in the heat, the seal also keeps out critters. The air-tight seal forms a barrier to insects. With this barrier, bugs can’t get in and spoil your food.
With this sense of security, you can leave your Sun Oven out for hours, comfortable that you won’t have an issue with bugs and insects.
Sun Oven Insulation
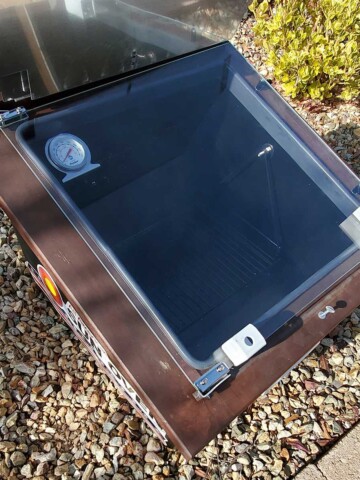
The Sun Oven is well insulated from top to bottom. High-quality, food-grade insulation surrounds the cooking chamber. The low-iron tempered glass door further insulates the cooking chamber from heat loss.
In the heat of the day, the glass door of the Sun Oven gets warm to the touch. When the oven chamber is 350°, the surface of the glass door only heats to about 155°.
This is hot enough to keep your neighbor’s dog, or any other animal, from eating your pot roast. They’ll sense the heat and stay away from the Sun Oven.
Even at high noon, there is little to no heat that you can feel on the outside of the oven. This is because It’s very well insulated. Additionally, the reflectors don’t get hot.
The result of the high-quality insulation is your Sun Oven remains efficient, cool, and safe.
The most important part of the Sun Oven is the gasket. The gasket forms an airtight seal and will last a lifetime. The gasket is the reason the Sun Oven gets much hotter than homemade solar cookers or other knockoffs you may have seen. A quick wipe between uses with a damp cloth is all the maintenance the gasket needs.
The reflectors are constructed of highly polished, anodized aluminum that is 86% reflective. They’ll never oxidize, rust, or corrode. Clean the reflectors with any household glass cleaner. Use Windex, vinegar, water, or whatever you use to clean your windows. The reflectors might get scratched and dented over time, but that’s ok, it doesn’t effect the performance of the Sun Oven.
The outer shell is made of ABS plastic, while the inner cooking chamber is constructed of black anodized metal. Sandwiched between the cooking chamber and the outer shell is a thick layer of nontoxic, food-grade, fiberglass insulation used in pizza ovens. It can be 400° inside the oven and the sides are cool enough to touch. You won’t feel any heat from the inside.
Occasionally the parts in the direct sun get warm, but the Sun Oven isn’t losing any heat. The insulation is rated for pizza ovens that operate at over 500°. Therefore, the Sun Oven retains heat very well.
The inner anodize shell is easy to clean and maintain. Just wipe it out with a dishrag or even spray it out with a garden hose.
The glass door of the Sun Oven is constructed of custom-formulated, low-iron, tempered glass. While the low-iron glass is four times more expensive than standard tempered glass, it adds efficiency and is critical to the heat retention of the Sun Oven.
The thick, wooden bezel around the top of the Sun Oven is handmade out of high quality poplar wood, with a water-resistant stain. It’s best to apply Linseed oil to the wood every 3-4 years to protect the wood.
Placement
Put your Sun Oven in a sunny place which is unobstructed by shadows from trees, buildings, etc. Remember that areas not currently shadowed may be affected later by trees, buildings, or other large objects as the sun moves across the sky.
Setup
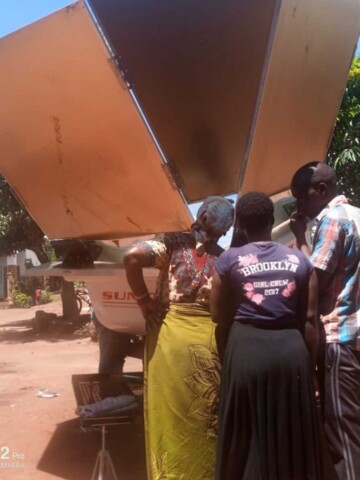
Unsnap the webbing strap that holds the reflectors in place. Lift and unfold the reflectors (which are hinged to the top of the Sun Oven) and slide the slot in the bottom section of the reflectors over the thumbscrew in the wooden frame, making sure the thumbscrew fits through the slot. Twist the thumbscrew one-quarter turn to hold the reflectors in place.
The latches that hold the glass door shut (on the right side of the door) are tightened before shipping – you will need to unscrew them ¼ to ½ turn to make them easier to operate.
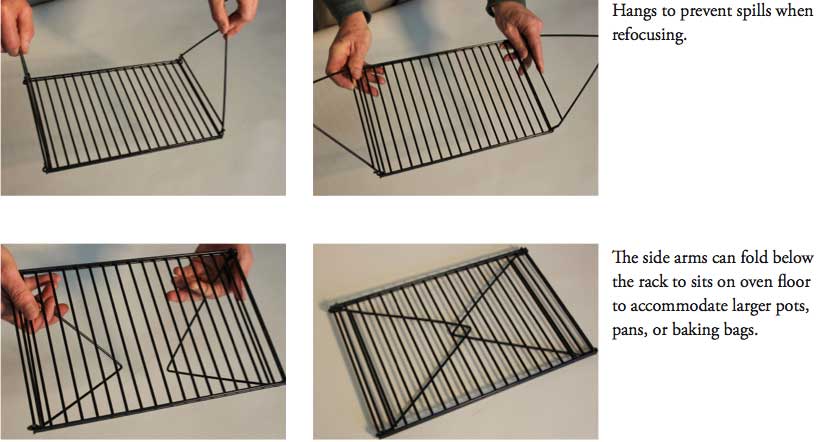
Dual-Purpose Leveling Rack
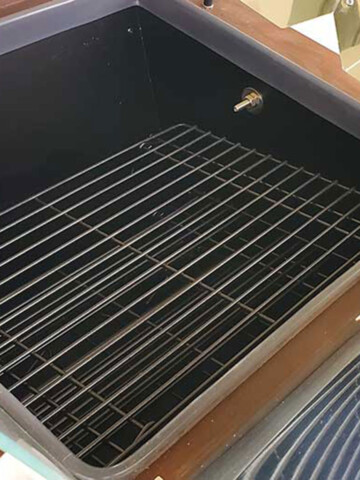
The Sun Oven is equipped with a dual-purpose leveling rack which hangs from the threaded rods inside the oven and swings freely to prevent spilling. The dual-purpose leveling rack can also be set on the floor of the oven to increase the usable area inside the Sun Oven and allow larger pots or pans to be used.
It is important to note that pots and pans should be placed on the dual-purpose leveling rack, not on the floor of the oven. To cook evenly, there must be air flow all the way around the pot. The rack will allow air to pass under the pot and ensure an even heat.
To hang the rack, bend the side arms outward and place the rack on the threaded rods. The side arms can fold below the rack as shown below.
Wind Resistant Alignment Leg
The Sun Oven is equipped with a wind resistant alignment leg which will allow you to raise or lower the oven’s orientation to meet the sun on the horizon. (The alignment leg is T-shaped.) The alignment leg is already inserted it into the back of the oven.
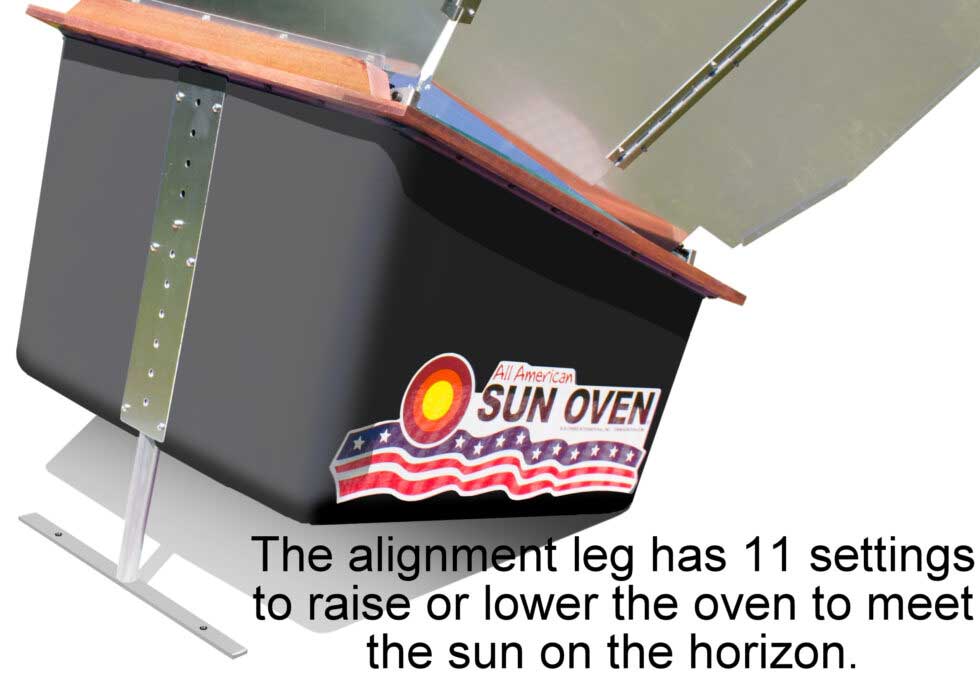
Two wire stakes are included which can be put through the holes in the alignment leg base and stuck into the ground for increased stability on windy days.
Focusing
Locate the white E-Z Sun-track indicators attached to the bottom corners of the glass door. Aim the front of your Sun Oven towards the sun.
If you stand behind or on the left side of the Sun Oven you will notice that each indicator has two small holes. As the light of the sun shines through the top hole, a small round dot of light will appear inside the indicator.
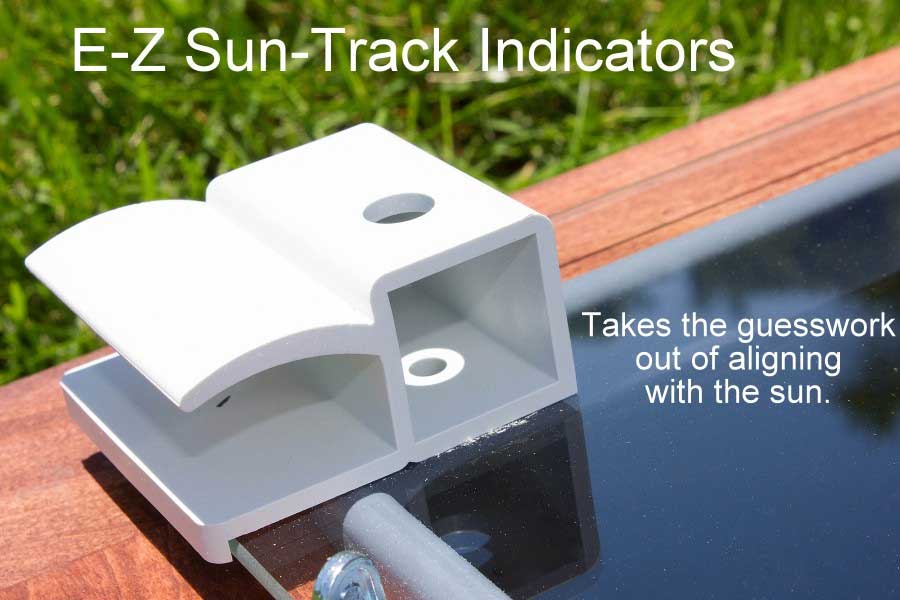
When the oven is perfectly aligned with the sun, the round dot will be centered over the bottom hole. Move the oven from side to side and adjust the height of the rear alignment leg so the round dot of light shines directly into the bottom hole.
While cooking it will be necessary to occasionally move the oven to follow the sun. To maintain the maximum temperature, it is best to refocus every 30 minutes. If you are leaving the oven unattended for a long period of time, we suggest that you immediately aim the Sun Oven towards where the sun will be during its strongest time (between 1 PM and 2 PM).
The Sun Oven works best on clear, sunny days. Intermittent clouds will slow down (but not stop) the cooking.
One big advantage of the Sun Oven is that it uses any pot or pan that is oven safe. Any pan that you can put in your regular oven you can also use in the Sun Oven.
There are several suggestions to keep in mind with pots and pans. First, except for bread, cakes, muffins, etc. use a pot or pan with the lid on it. If you cook with an open pot, the escaping steam fogs up the inside of the glass. This decreases the solar heating and therefore the temperature inside the oven.
The most efficient and fastest way to cook in the Sun Oven is with enamelware pots. Not to be obvious, but enamelware pots are enamel coated steel. These types of cookware are thin and dark.
Remember, in the chamber of the Sun Oven everything is at an even temperature, so the thicker the pot, the more mass you have to heat and the longer it takes for the cookware to come to temperature. Go back to cooking a whole chicken. If the desire is to cook a 3-pound bird in an hour and a half, then use enamelware. The enamelware heats quickly and seals in the steam, making the perfect environment for cooking chicken.
Extend this example to all-day cooking with a frozen chicken. Here, the frozen chicken is prepared early in the morning in a cast iron Dutch oven. Position the Sun Oven facing south and come back later and dinner is hot, juicy, and ready to eat. Dutch ovens take an hour and a half longer to come up to temperature when compared to enamelware pots. This is because of their increased thickness and thermal mass. The big advantage of Dutch ovens and other cast-iron pots is the flexibility when cooking with them. If the meal is to be left unattended all day, there’s no need to worry if it gets cloudy later in the day. Once the cast iron comes up to temperature, the thermal mass of the Dutch oven, and the superior insulation of the Sun Oven, ensure the chamber retains temperature and continues to cook the meal to completion. Even if the sun completely disappears!
Corningware or Pyrex works well too. With this cookware, add about 15% to the cooking time compared to enamelware. A simple hint, start cooking a little earlier. RV users like to cook with silicone bread “pans” and muffin “tins” because they’re lighter to travel with. These work equally well for baked goods in the Sun Oven.
The only cookware to use caution with is reflective, shiny pots such as stainless steel. These pots reflect light out of the Sun Oven. This decreases the temperature inside the oven. If these are all you have, don’t worry! Still use them, just drape a dark dish towel over the lid and sides. This limits the reflections and keeps the temperatures up in your Sun Oven.
One final tip. Use mason jars to cook two different things at the same time. There’s enough room on the leveling rack to place two quart-sized mason jars next to the pot. Cook a full meal in the Sun Oven with side dishes in mason jars!
If there’s enough sun to cast a shadow, then you can cook in the Sun Oven.
• If it’s overcast or cloudy and you can’t see a shadow, then you can’t cook in the Sun Oven. It won’t get hot enough.
Cooking Year-Round
There are some distinct differences between winter cooking and summer cooking. As an example, in southern latitudes in June, the Sun Oven is used for up to 13 hours a day.
In comparison in December, the season limits cooking times to about 5 hours a day. As long as the sun’s strong enough to cast a shadow, cooking with a Sun Oven is effective and fun. People have cooked in temperatures as low as 10 below zero with no problem. At one point, an owner in Wisconsin sent SOI a photo of cooking with the Sun Oven when it was 30 below zero. SOI has even shipped Sun Oven to Antarctica, where the new owners cooked for several weeks at temperatures as low as 40 below zero.
Cooking in the Winter – Things to Know
The Sun Oven can be efficiently used year-round. One thing to keep in mind is the T-leg on the back of the Sun Oven. The T-leg extends to full height and perfectly angles the oven even between early November and late February.
In some higher latitudes, this still doesn’t allow the Sun Oven a proper angle for the sun. In that case, you can lay the Sun Oven on it’s back and cook.
To do so, turn the Sun Oven upside down when cooking in the winter. Open the reflectors and latch them in place with the thumbscrew. Next, lay the Sun Oven with the back of the oven on the ground, and the carrying handle at the top. This gives the Sun Oven stability and increased winter efficiency. It’s ok to let the reflector of the Sun Oven lay flat on the ground. It can rest on the snow, even on a table when cooking in the winter.
Align the Sun Oven perfectly in winter with the E-Z sun-track indicators. The leveling rack folds up, so it fits right behind the thermometer, flat on the bottom. The only drawback to this winter configuration is that the thermometer ends up upside down. It’s impressive the way this position adds an hour of cooking in the morning and the evening of November through February. Adjust the position to stay aligned with the sun every 30 minutes when cooking in winter to keep the oven at peak temperature.
Cooking on Windy Days
The T-Leg is designed to be staked down to add support to the Sun Oven for windy days. Use the included stakes to secure the Sun Oven against the occasional gust of wind. Additionally, the reflectors have a notch with a thumbscrew that locks them into place. As long as the oven is staked into the ground, and the reflectors are locked, the Sun Oven is wind-proof up to 35 MPH.
If it’s windier than 35MPH, you may want to not use your Sun Oven.
If you have your Sun Oven on a table during a windy day, you can use woodworking clamps (i.e. c-clamps) to secure the T-leg to the table.
Samiam says
Keep going, you can do it!
Don't give up... keep making your ovens...
We loooooove ours, the younger generation is waking up and is seeing your insight and wisdom in your ovens...
💞💕💖
P.S.
Can you make a Sun Oven food dryer pleeeeeease 🤗